共计 12445 个字符,预计需要花费 32 分钟才能阅读完成。
Last time we talked about Magento’s System Configuration system. If you missed it, you’ll want to go back and catch up. So, we glossed over a lot of the tags you could use within an individual field.
01 |
<fields> |
02 |
<!-- ... ---> |
03 |
<fieldname translate="label"> |
04 |
<label>Field Name</label> |
05 |
<frontend_type>text</frontend_type> |
06 |
<sort_order>2</sort_order> |
07 |
<show_in_default>1</show_in_default> |
08 |
<show_in_website>1</show_in_website> |
09 |
<show_in_store>0</show_in_store> |
10 |
</fieldname> |
11 |
<!-- ... ---> |
12 |
</fields> |
Consider the rest of this article a thorough de-glossing.
<label/> and <comment/>
These tags allow you to set end-user facing text for your System Configuration field.  A label appears to the left of your form field, while a comment will appear directly under the field.
<show_in_default/>, <show_in_website/>, <show_in_store/>
These are boolean fields with a value of 1 or 0. They indicate if the field will show up when viewing the System Configuration in the default view, the website view, or the store view. The implicit assumption is that they also control what options are configurable at each level. However, there’s nothing on the backend enforcing this assumption. That is, a field may be configured to with the following
<show_in_store> 0 </show_in_store> but it will still be possible (although not advisable) to set and retrieve this field’s value at the store level via programatic means.
<sort_order/>
The <sort_order/>is a numerical value that’s used to determine the order of the fields within their group container. The higher the number, the lower the field will sort on the screen.
<frontend_type/>
<frontend_type/>determines the type of field that will be used to collect the configuration value. Values supported in Magento 1.4 Community Edition are
- allowspecific
- export
- image
- import
- label
- multiselect
- obscure
- password
- select
- text
- textarea
- time
The value of this field is used in a Factory style pattern to instantiate a class with a format of
Varien_Data_Form_Element_Type where “Type” is the value of the <frontend_type/>’s text node. This happens in the addField method of theVarien_Data_Form_Element_Abstractclass, as seen below
class Varien_Data_Form_Abstract extends Varien_Object { //... public function addField($elementId, $type, $config, $after=false) { if (isset($this->_types[$type])) { $className = $this->_types[$type]; } else { $className = 'Varien_Data_Form_Element_'.ucfirst(strtolower($type)); } $element = new $className($config); $element->setId($elementId); if ($element->getRequired()) { $element->addClass('required-entry'); } $this->addElement($element, $after); return $element; } } <frontend_class/>
Don’t be fooled, <frontend_class/> is not a Grouped Class Name. The <frontend_class/> tag can be used to modify the class attribute of the form element tagthat’s generated for your field. That is, this config field allows you to add a Cascading Stylesheet Class (i.e. “frontend” class) to the generated form element. For example, a field configured with the following
<frontend_type>select</frontend_type> <frontend_class>free-method</frontend_class> will render as
<select> <validate/>
At first glance, <validate/>is a confusing configuration option. It appears to just add a CSS class to the generated tag. A configuration like this
<validate>validate-email</validate> will yield a form element like this
<input type="text" /> As with much of Magento, there’s more going on here. The presence of this CSS class will trigger the system’s client-side validation routines. For example, the above code would cause a javascript email validation to be run against the field. If the field fails the validation test, the end-user won’t be able to submit the configuration form. You can take a look at the available validation routines in
js/prototype/validation.js and here’s the above mentioned email validation routine from the same file
['validate-email', 'Please enter a valid email address. For example johndoe@domain.com.', function (v) { return Validation.get('IsEmpty').test(v) || /^[a-z0-9,!\#\$%&'\*\+\/=\?\^_`\{\|\}~-]+(\.[a-z0-9,!\#\$%&'\*\+\/=\?\^_`\{\|\}~-]+)*@[a-z0-9-]+(\.[a-z0-9-]+)*\.([a-z]{2,})/i.test(v) }], which looks to be a monstrous, but useful, regular expression.
<can_be_empty/>
The <can_be_empty/> tag is used with multiselect fields. The short version is, if you wish to a allow “no selection” to be a valid configuration, use this field. What happens behind the scenes is if can_be_emptyis true, the system renders a hidden field on the System Configuration page
File: lib/Varien/Data/Form/Element/Multiselect.php if ($this->getCanBeEmpty()) { $html .= '<input type="hidden" name="' . parent::getName() . '" value="" />'; } which ensure the form processing code will accept an empty selection.
<depends/>
<depends/>allows you specify that your configuration field should only be displayed when another confgiruation field in the same group has a specific value. For example, the Paypal Express System Configuration has the following select defined.
<specificcountry translate="label"> <label>Countries Payment Applicable From</label> <frontend_type>multiselect</frontend_type> <sort_order>110</sort_order> <source_model>adminhtml/system_config_source_country</source_model> <show_in_default>1</show_in_default> <show_in_website>1</show_in_website> <show_in_store>0</show_in_store> <depends><allowspecific>1</allowspecific></depends> </specificcountry> You’ll notice the
<depends><allowspecific>1</allowspecific></depends> This is telling the system that if the <allowspecific>field (defined with the following)
<allowspecific translate="label"> <label>Payment Applicable From</label> <frontend_type>select</frontend_type> <sort_order>100</sort_order> <source_model>adminhtml/system_config_source_payment_allspecificcountries</source_model> <show_in_default>1</show_in_default> <show_in_website>1</show_in_website> <show_in_store>0</show_in_store> </allowspecific> has a value of “1”, then the <specificcountry> field should be displayed. This happens instantly via some behind the scenes Javascript. While it appears to work with any fields that send out on onchangeevent, the core Magento system only uses this function where the parent field is a select. If you’re paranoid about forward compatibility, I’d apply the same restriction to your own System Configuration fields, as it’s hard to tell where the core Magento team may take this feature in the future.
<source_model/>
The <source_model/>tag specifies a Model class (in URI/Grouped Class Name format) to populate a field’s default options. As of Magento Community Edition 1.4x, it works with selects and multi-selects. In addition to the standard Magento Grouped Class Name, an extended syntax of
module/modelname::methodName is supported. The system will instantiate a Model with getModel('module/modelname') and call its methodNamemethod to retrieve an array of value/label paris to use for the source. If the method name is left off, thetoOptionArraymethod will be called by default.
<frontend_model/>
By default, Magento Form Elements are rendered with the Block class
Mage_Adminhtml_Block_System_Config_Form_Field However, if you want to use a custom renderer for your System Configuration field, you can specify a different block class (in URI/Grouped Class Name form) with the <frontend_model/> tag. For example, the last_update field in the adminnotificationgroup
<last_update translate="label"> <label>Last update</label> <frontend_type>label</frontend_type> <frontend_model>adminhtml/system_config_form_field_notification</frontend_model> <sort_order>3</sort_order> <show_in_default>1</show_in_default> <show_in_website>0</show_in_website> <show_in_store>0</show_in_store> </last_update> specifies that a field renderer of adminhtml/system_config_form_field_notificationshould be used. This translates into the following class
File: app/code/core/Mage/Adminhtml/Block/System/Config/Form/Field/Notification.php class Mage_Adminhtml_Block_System_Config_Form_Field_Notification extends Mage_Adminhtml_Block_System_Config_Form_Field { protected function _getElementHtml(Varien_Data_Form_Element_Abstract $element) { $element->setValue(Mage::app()->loadCache('admin_notifications_lastcheck')); $format = Mage::app()->getLocale()->getDateTimeFormat(Mage_Core_Model_Locale::FORMAT_TYPE_MEDIUM); return Mage::app()->getLocale()->date(intval($element->getValue()))->toString($format); } } The core team is overriding the _getElementHtmlmethod to ensure that any entered date will be displayed with the same format.
<backend_model/>
Once a form is submitted to Magento, its values must be saved. For System Configuration fields, this is normally handeled with the Model class
Mage_Core_Model_Config_Data However, there may be times where you want your System Configuration to use a different backend model. The<backend_model/> tag allows you to specify a different Model class (using URI/Grouped Class Name format). Most often this isn’t because you want to save where the data is stored, but rather because you want to perform some additional action when a field is saved. By extending the Mage_Core_Model_Config_Data class with your own model and defining a _beforeSave and/or _afterSave method on your model, you can take additional action anytime a config value is changed. For example, consider the import field in the tablerategroup
<import translate="label"> <label>Import</label> <frontend_type>import</frontend_type> <backend_model>adminhtml/system_config_backend_shipping_tablerate</backend_model> <sort_order>6</sort_order> <show_in_default>0</show_in_default> <show_in_website>1</show_in_website> <show_in_store>0</show_in_store> </import> The Grouped Class Name adminhtml/system_config_backend_shipping_tableratetranslates to the following class
class Mage_Adminhtml_Model_System_Config_Backend_Shipping_Tablerate extends Mage_Core_Model_Config_Data { public function _afterSave() { Mage::getResourceModel('shipping/carrier_tablerate')->uploadAndImport($this); } } Here the core team is hooking into the _afterSave method (which is called after a model is saved) to update theshipping/carrier_tablerateModel with information from the just uploaded file.
<upload_dir/> and <base_url/>
Both these tags are used with System Configuration fields that use the <frontend_type>image</frontend_type>field with a <backend_model>adminhtml/system_config_backend_image</backend_model>backend model. These determine both
- Where the image file is uploaded
- The base URI path used when rendering an
<img>tag
First, let’s cover the <upload_dir/>tag
<upload_dir config="system/filesystem/media" scope_info="1">sales/store/logo</upload_dir> There’s threethings being set by the above.
- The base image upload path
- The path, from the base, where this specific image field should be uploaded
- Whether or not the current config scope should be appended to the path
The base image upload path is set with the config attribute (system/filesystem/media above). This specifies a System Configuration path. That is, the base image upload path isn’t system/filesystem/media, but it’s the value of the Magento System Configuration at system/filesystem/media (which resolves to {{root_dir}}/mediain a default Community Edition install) Once the base image upload path is found, we need to append the sub-directory this specific image should be uploaded to. To get this we append the value of the <upload_dir/>'stext node
sales/store/logo to the value of the base image upload path, which will give us something like this
/path/to/magento/install/media/sales/store/logo Finally, if the scopeattribute is set to “1”, the current Configuration Scope will be transformed into a path. If you were uploading an image with the scope set to default, you’d get a path like
/path/to/magento/install/media/sales/store/logo/default However, if you were uploading an image with the scope set to a specific store, you’d end up with a path like
/path/to/magento/install/media/sales/store/logo/stores/5 where “5” is the ID of the store scope you’re currently at. When we upload an image, only the scope and image name portion of the path get saved to the config. This means we need to tell the System what the base URL should be for our image.
<base_url type="media" scope_info="1">sales/store/logo</base_url> The scope_info and text node function the same as <upload_dir/>’s. Where <base_url/> differs is in setting thebase of the image URI (which is going to, naturally, be different than the local base file system path). As you’ve likely intuited, the base path is set using the type attribute. The configured value will be passed into the getBaseUrl method on the global Mageobject to set the base URL for the image. The the above example, that would look something like
Mage::getBaseUrl('media') You can see the actual code that does this in the Mage_Adminhtml_Block_System_Config_Form_Field_Imageclass.
class Mage_Adminhtml_Block_System_Config_Form_Field_Image extends Varien_Data_Form_Element_Image { //... protected function _getUrl() { $url = parent::_getUrl(); $config = $this->getFieldConfig(); /* @var $config Varien_Simplexml_Element */ if (!empty($config->base_url)) { $el = $config->descend('base_url'); $urlType = empty($el['type']) ? 'link' : (string)$el['type']; $url = Mage::getBaseUrl($urlType) . (string)$config->base_url . '/' . $url; } return $url; } //... } Finally, it’s important to note that this base URL is not used consistently throughout Magento to create a final URL for a configured image. From what I’ve seen this is onlyused to create an image preview within the System Configuration admin itself.
Wrapup
As you can see, the Magento System Configuration admin is a powerful system that’s almost an application development environment unto itself. By leveraging the functionality built into the system you can quickly and reliably build out new custom functionality for your, or your client’s stores.


 多乐士
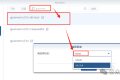
通过摸索发现ssh拉取会报错,直接网页访问下载会报404错误,不知道原因;但是可以通过群晖CM注册表访问下载,其方法如下:
Container Manager-注册表-设置-新增-注册表名称随便写,注册表URL填你的加速地址,勾选信任的SSL自我签署证书,登录信息不填-应用-使用你的地址,这是注册表会显示了,在搜索栏中输入映像名称,搜索结果在每一页的最后一个,你需要划到最后一个进行下载,实测可正常下载安装。
以上供网友参考。
多乐士
通过摸索发现ssh拉取会报错,直接网页访问下载会报404错误,不知道原因;但是可以通过群晖CM注册表访问下载,其方法如下:
Container Manager-注册表-设置-新增-注册表名称随便写,注册表URL填你的加速地址,勾选信任的SSL自我签署证书,登录信息不填-应用-使用你的地址,这是注册表会显示了,在搜索栏中输入映像名称,搜索结果在每一页的最后一个,你需要划到最后一个进行下载,实测可正常下载安装。
以上供网友参考。
 辞了老衲
这个确实有帮助。
辞了老衲
这个确实有帮助。
 渋驀
当然任何时候都可以用curl命令和crontab来实现动态更新DDNS的ip地址:
1、安装crontab之后为root用户创建文件/var/spool/cron/root
2、创建并配置ddnsupdate.sh,放到/usr/bin/文件下,文件内容(以he.net为例):
Autodetect my IPv4/IPv6 address:
IPV4:curl -4 "http://dyn.example.com:password@dyn.dns.he.net/nic/update?hostname=dyn.example.com"
IPV6:curl -6 "http://dyn.example.com:password@dyn.dns.he.net/nic/update?hostname=dyn.example.com"
3、添加执行权限chomod +x /usr/bin/ddnsupdate.sh
4、编辑root用户的crontab:*/10 * * * * /usr/binddnsupdate.sh,每10分钟执行一次。好了,可以享受你的DDNS了
渋驀
当然任何时候都可以用curl命令和crontab来实现动态更新DDNS的ip地址:
1、安装crontab之后为root用户创建文件/var/spool/cron/root
2、创建并配置ddnsupdate.sh,放到/usr/bin/文件下,文件内容(以he.net为例):
Autodetect my IPv4/IPv6 address:
IPV4:curl -4 "http://dyn.example.com:password@dyn.dns.he.net/nic/update?hostname=dyn.example.com"
IPV6:curl -6 "http://dyn.example.com:password@dyn.dns.he.net/nic/update?hostname=dyn.example.com"
3、添加执行权限chomod +x /usr/bin/ddnsupdate.sh
4、编辑root用户的crontab:*/10 * * * * /usr/binddnsupdate.sh,每10分钟执行一次。好了,可以享受你的DDNS了
 21410
请问下载链接在那里?
21410
请问下载链接在那里?
 madkylin
不错,不错,谢谢分享了,好东西啊
madkylin
不错,不错,谢谢分享了,好东西啊 
 feilung
求方法
feilung
求方法
 zengsuyi
应该挺不错的
zengsuyi
应该挺不错的
 zise
看看是怎么操作的。。
zise
看看是怎么操作的。。