共计 4463 个字符,预计需要花费 12 分钟才能阅读完成。
说明:当我们通过群晖 VMM 虚拟机安装 OpenWrt 时,默认会分配一个 10GB 的存储空间,而实际情况中 OpenWrt 存在大量的剩余空间是未被使用的,典型的铺张浪费有木有?OpenWrt 实际使用容量完全取决于 OpenWrt 编译时所设置的固件大小。若我们想要充分折腾软路由,则需要对 OpenWrt 进行扩容。
对于存储空间扩容的思路主要有两种:利用剩余的存储空间或是添加一块新的磁盘进行扩容。本文将以两个小示例分别介绍这两种扩容方案具体的实现步骤,以供大家举一反三。如果你也有扩容的需求,可部分参考本文,其实逻辑上相通。
OpenWrt 扩容方案
注意⚠️:本文教程基于运行的群晖VMM虚拟机,
x86_64平台 +EXT4文件系统的 OpenWrt;对于squashfs文件系统及硬路由的扩容方案可能并不适用。
1. 前期准备
1.1 如果你怕操作出错,可进入 虚拟机 找到正在运行的 OpenWrt 虚拟机,点击 操作 – 拍快照 方便出错时可以快速恢复。

opkg update
opkg install cfdisk fdisk e2fsprogs
命令行中 cfdisk 、fdisk 均为磁盘分区工具,e2fsprogs 包含了 mkfs 命令,用于格式化分区。
2. 方案一:利用剩余空间扩容
2.1 创建新分区
SSH 终端运行 cfdisk 命令进入磁盘分区界面,通过键盘上下键切换到 Free space (剩余空间),左右键切换至 NEW (新增分区),然后按下回车键。
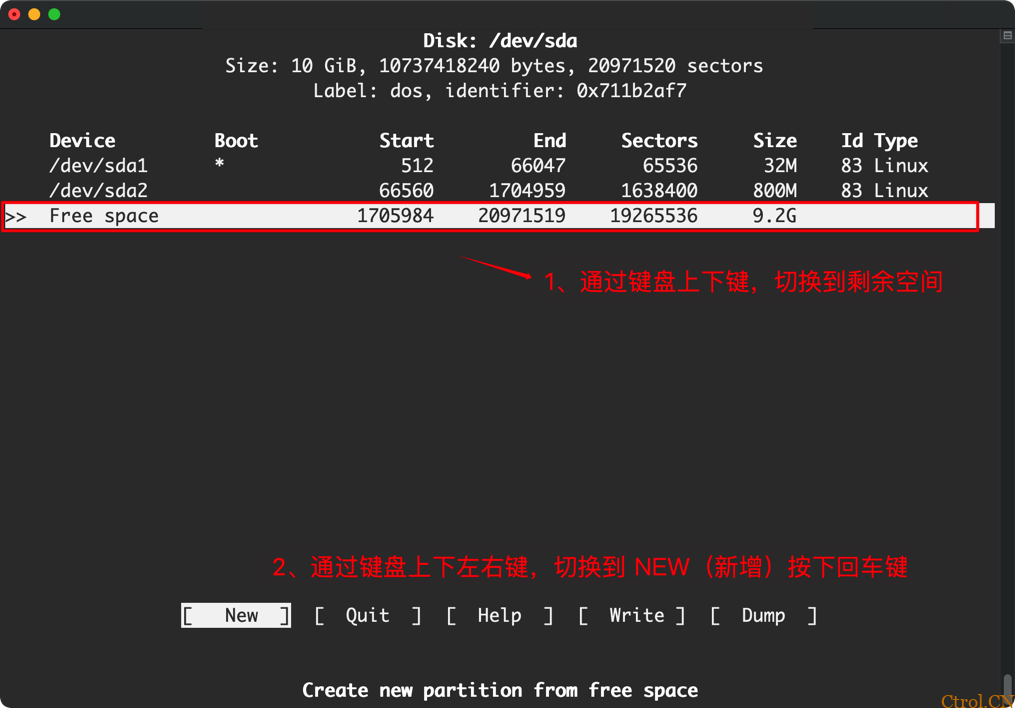
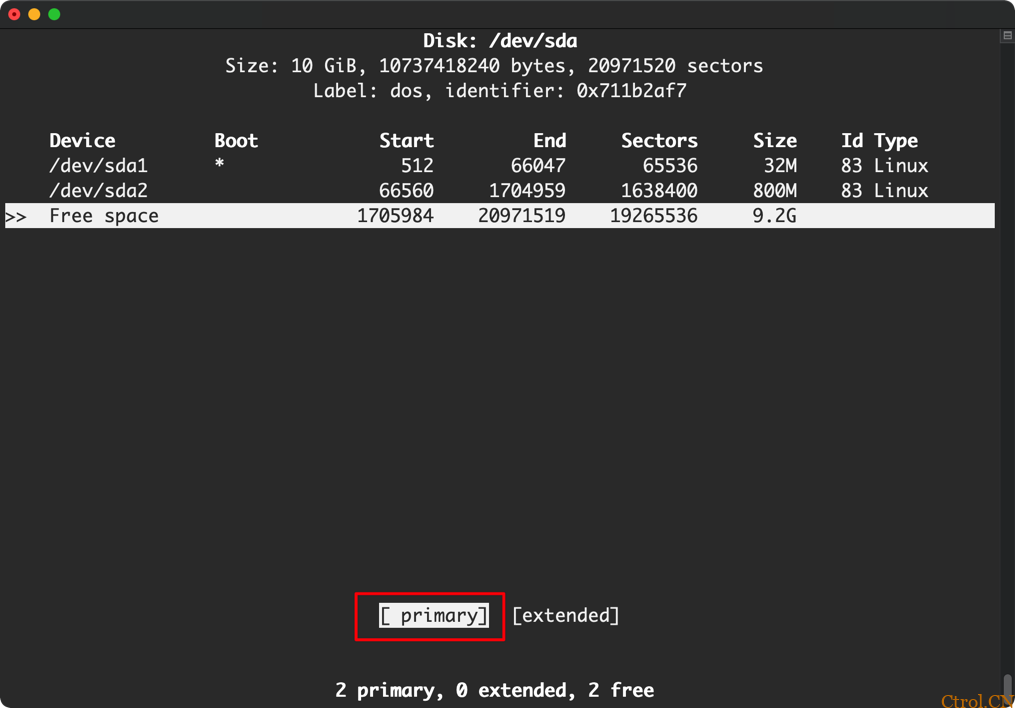
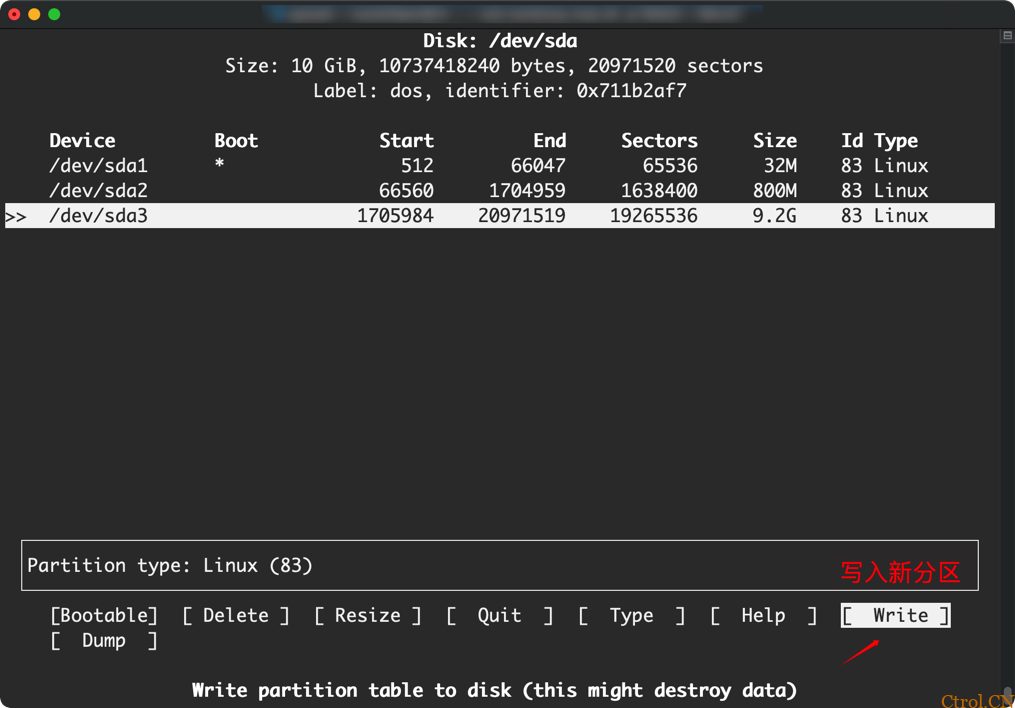
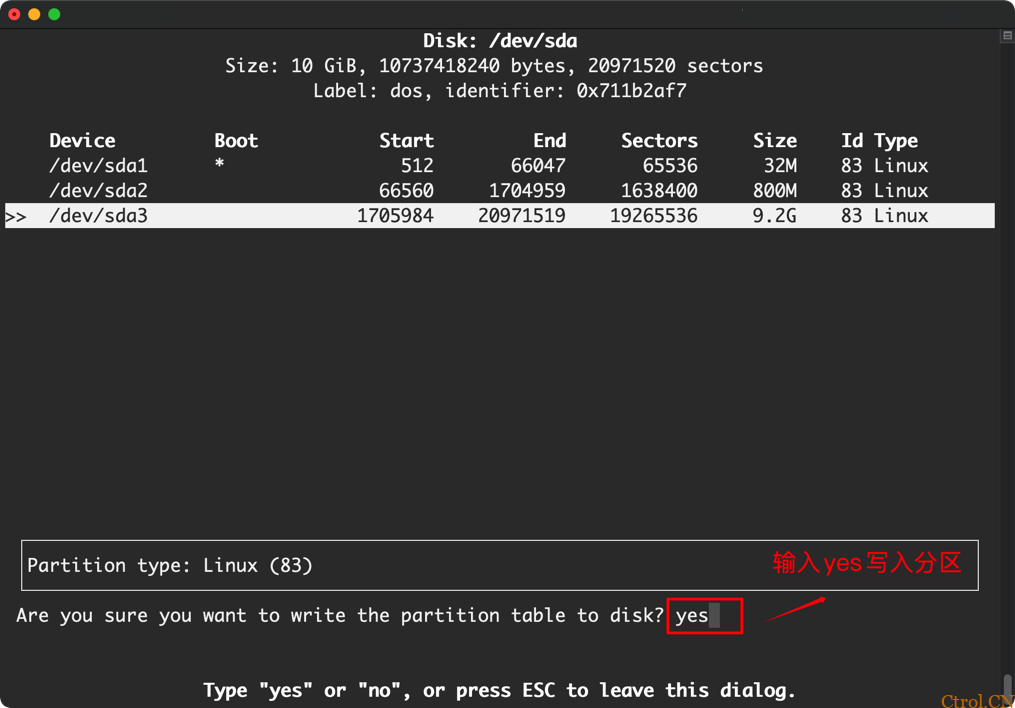
fdisk -l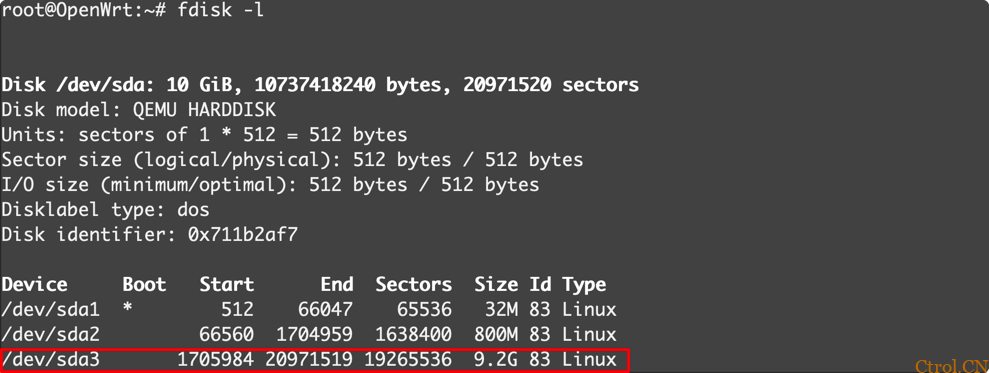
2.2 格式化新分区
SSH 终端运行下面的命令,将新分区的文件系统格式化为 ext4:
mkfs.ext4 /dev/sda32.3 挂载新分区
进入 OpenWrt 管理后台,依次点击 系统 – 挂载点 找到并点击全局设置中的 生成配置 。
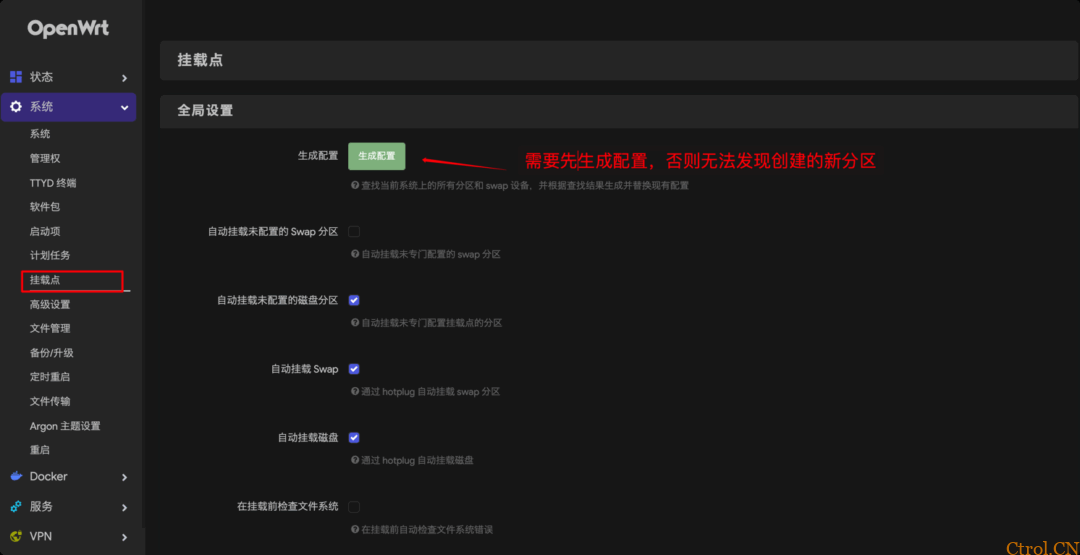
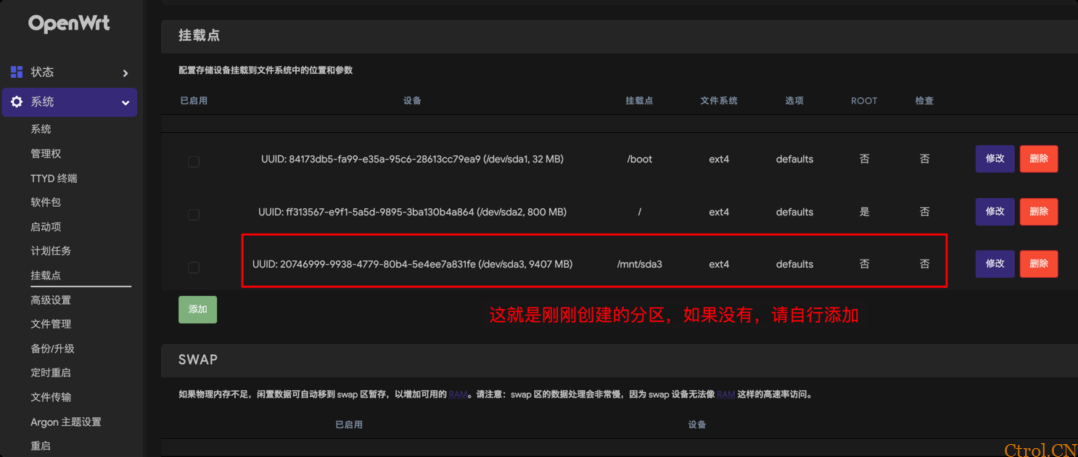
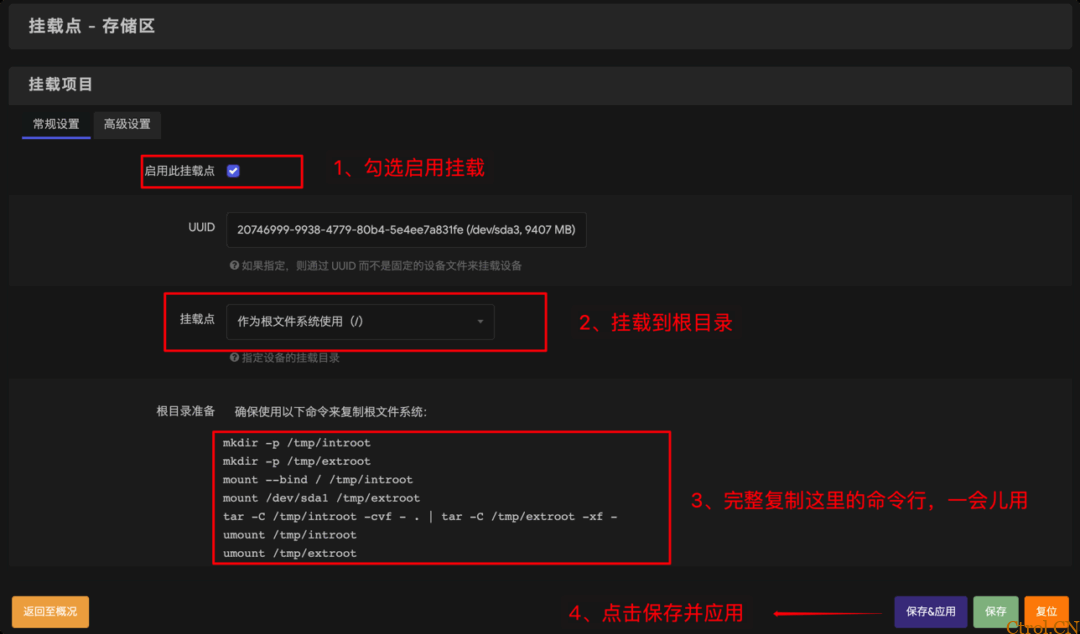
⚠️ 上面复制得到的命令行不要直接运行!!!不要直接运行!!!否则报错。
需要手动修改命令行中 mount /dev/sda1 /tmp/extroot 为 cfdisk 创建的新分区盘符,例如这里应修改为 mount /dev/sda3 /tmp/extroot,然后进入 SSH 终端,运行修改后的完整命令行,如下:
mkdir -p /tmp/introot
mkdir -p /tmp/extroot
mount --bind / /tmp/introot
mount /dev/sdb1 /tmp/extroot # 修改后
tar -C /tmp/introot -cvf - . | tar -C /tmp/extroot -xf -
umount /tmp/introot
umount /tmp/extroot
回车键到底,直到跑完所有命令行。然后运行 reboot 重启 OpenWrt ~
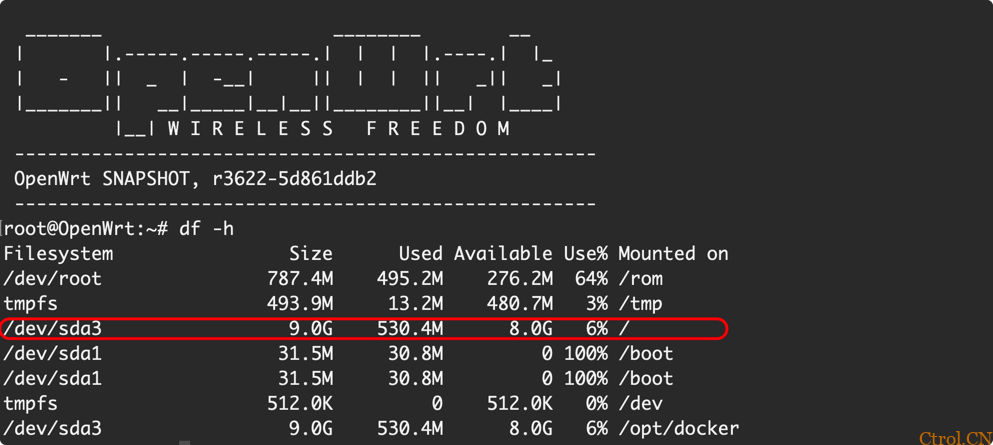
df -h ,如上图表示扩容成功~
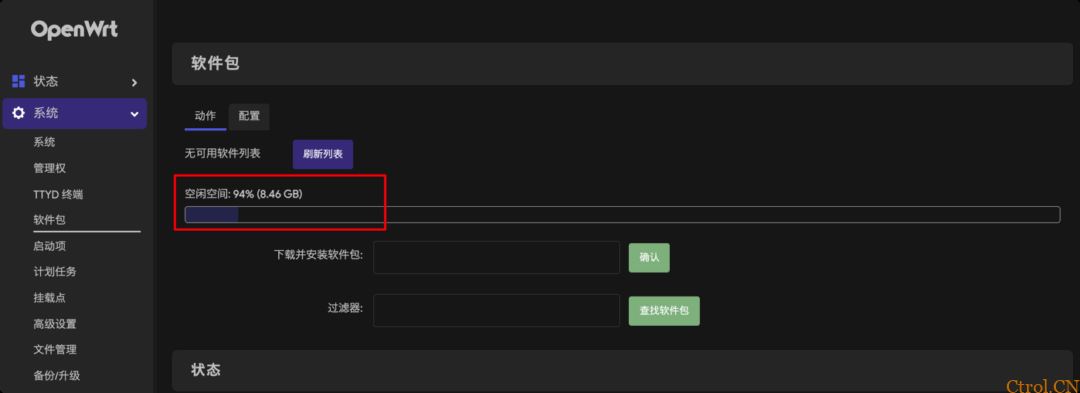
3. 方案二:通过新增磁盘扩容
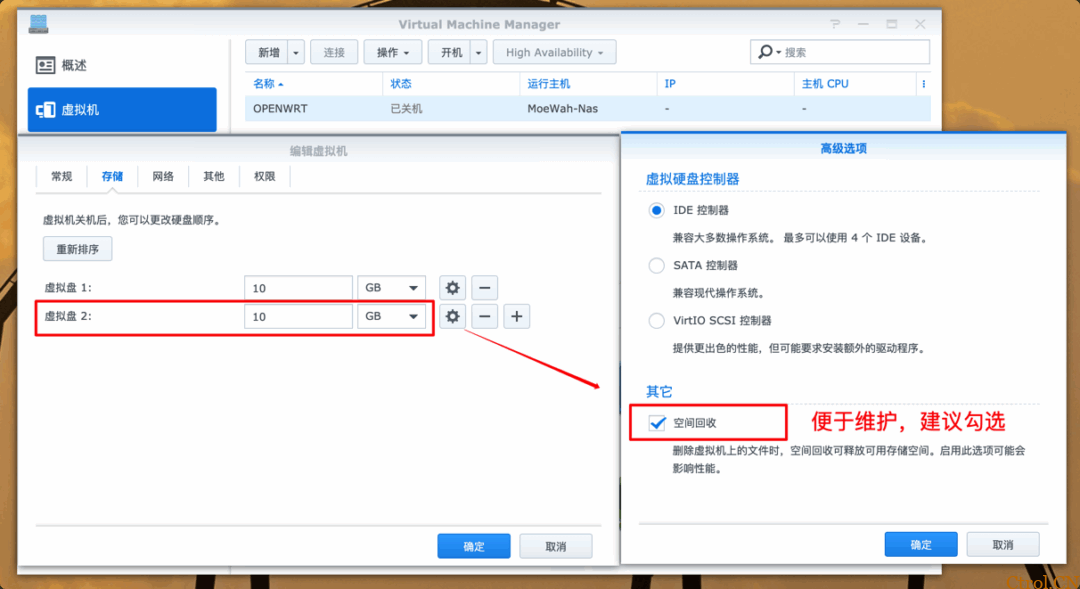
3.1 添加新磁盘
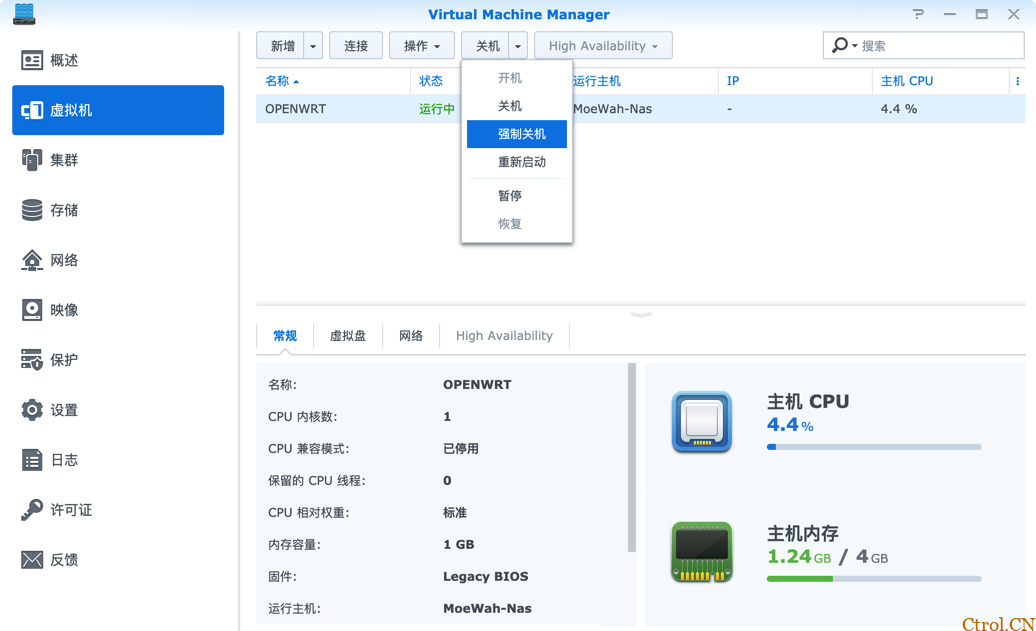
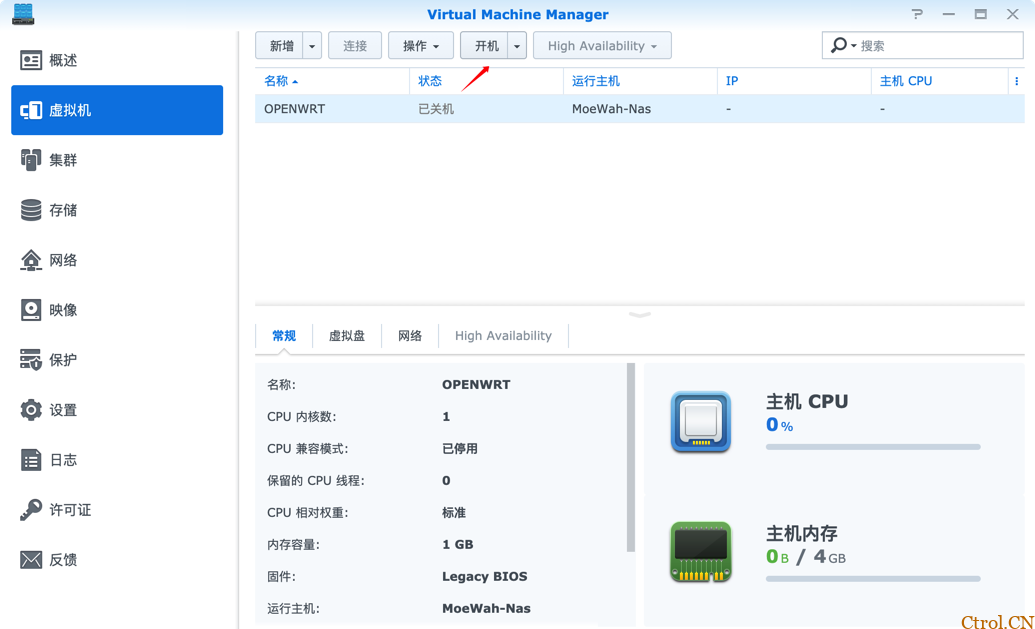
打开群晖 VMM 找到正在运行的 OpenWrt 虚拟机,选择 关机 – 强制停止。
3.2 磁盘分区
SSH 终端连接 OpenWrt,运行下面命令查看磁盘信息
fdisk -l此时,会显示一个未被使用的磁盘 sdb 即新磁盘,,屏幕打印信息如下:
root@OpenWrt:~# fdisk -l
若要使用这块新磁盘,就需要对新磁盘进行分区,运行以下命令:
fdisk /dev/sdb创建一个主分区,分区操作步骤如下:
root@OpenWrt:~# fdisk /dev/sdb

Welcome to fdisk (util-linux 2.37).
Changes will remain in memory only, until you decide to write them.
Be careful before using the write command.

Device does not contain a recognized partition table.
Created a new DOS disklabel with disk identifier 0x1d291a31.

Command (m for help): n (输入 n 创建分区)
Partition type
   p   primary (0 primary, 0 extended, 4 free)
   e   extended (container for logical partitions)
Select (default p): p (输入 p 创建主分区)
Partition number (1-4, default 1): (回车键,默认创建一个分区)
First sector (2048-20971519, default 2048): (回车键)
Last sector, +/-sectors or +/-size{K,M,G,T,P} (2048-20971519, default 20971519):

Created a new partition 1 of type 'Linux' and of size 10 GiB.

Command (m for help): w (输入 w 写入分区表)
The partition table has been altered.
Calling ioctl() to re-read partition table.
Syncing disks.
查看磁盘信息:
fdisk -l屏幕打印信息如下:
root@OpenWrt:~# fdisk -l
其中 /dev/sdb1 即新创建的新分区分配的盘符
3.3 格式化
将分区格式化 ext4 文件系统:
mkfs.ext4 /dev/sdb13.4 挂载分区
进入 OpenWrt 管理后台,依次点击 系统 – 挂载点 找到并点击全局设置中的 生成配置 。

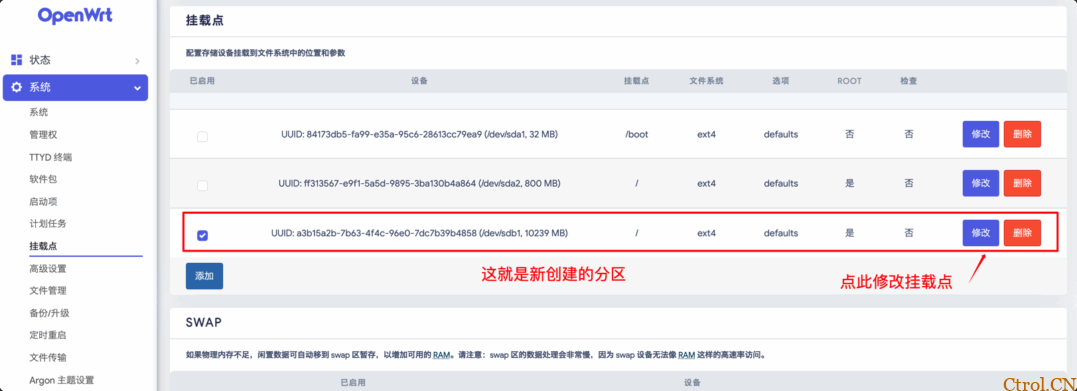
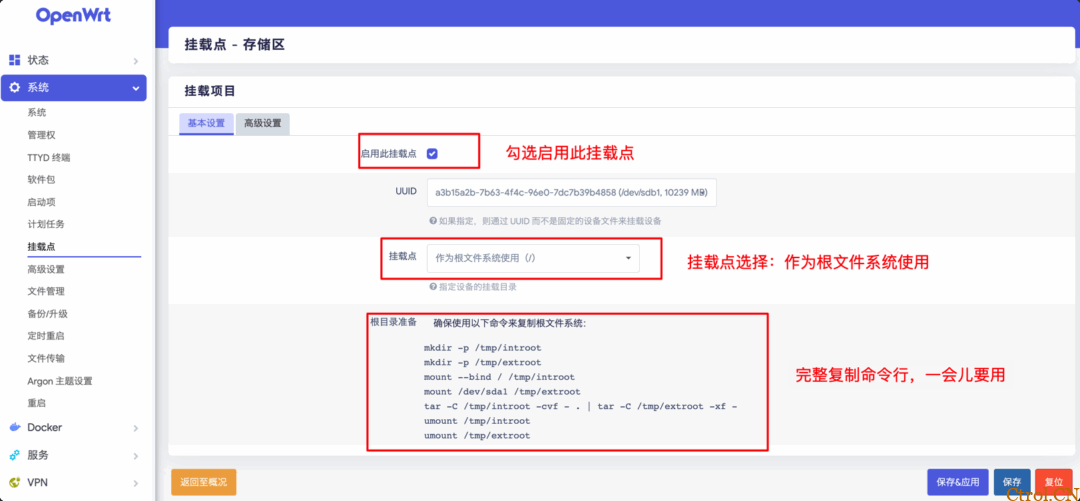
⚠️ 上面复制得到的命令行不要直接运行!!!不要直接运行!!!否则报错。
需要手动修改命令行中 mount /dev/sda1 /tmp/extroot 为 fdisk 创建的新分区盘符,例如这里应修改为 mount /dev/sdb1 /tmp/extroot,然后进入 SSH 终端,运行修改后的完整命令行,如下:
mkdir -p /tmp/introot
mkdir -p /tmp/extroot
mount --bind / /tmp/introot
mount /dev/sdb1 /tmp/extroot # 修改后
tar -C /tmp/introot -cvf - . | tar -C /tmp/extroot -xf -
umount /tmp/introot
umount /tmp/extroot
回车键到底,直到跑完所有命令行。然后运行 reboot 重启 OpenWrt ~

4. 写在最后
以上就是喵斯基部落提供的关于 OpenWrt 存储空间扩容的两个简单的示例,如果你使用的 OpenWrt 是 EXT4 文件系统可参考本文示例,但需要留意盘符可能有所不同,切勿完全照搬。如果使用的是 squashfs 文件系统那么挂载点需要设置为 /overlay 作为 overlay 分区使用。
转载来源:https://www.moewah.com/archives/4719.html 作者:喵斯基部落


 多乐士
通过摸索发现ssh拉取会报错,直接网页访问下载会报404错误,不知道原因;但是可以通过群晖CM注册表访问下载,其方法如下:
Container Manager-注册表-设置-新增-注册表名称随便写,注册表URL填你的加速地址,勾选信任的SSL自我签署证书,登录信息不填-应用-使用你的地址,这是注册表会显示了,在搜索栏中输入映像名称,搜索结果在每一页的最后一个,你需要划到最后一个进行下载,实测可正常下载安装。
以上供网友参考。


